While I did not manage to do anything on blue I did however have chance to visit mini matt now known as MJR thanks to mini HQ. While there I delivered the shopping list for blue. For those who don't know Matt, he is a genuine good guy with a large set-up dedicated to BMW mini. He offers tuning, servicing and paint work. The paint work is priced well and is a top job. Besides his services he also has attached a breakers yard so perfect to help me source everything at a good price.
This week I had planned to remove the engine in order to replace a nylon bush in the gearbox which unfortunately had melted otherwise the engine would be staying put. While performing the engine out job I agreed to help a friend remove the newman cam and ported / polished inlet horns and plenum. Only issue there was he was unsure how to remove the parts. I offered assistance and helped Rich learn how to do the cam change.
I decided that to start the day I need to sort all my tools out. Basically because we pushed blue in and did not sort the garage prior. Most the tools I needed where at the back of the garage and scattered in a card box at the front. Feeling a little fed up of loosing tools I decided to put everything back in my red 15 draw cabinet.
Sorting the tools and the garage meant rolling blue forward, this was easy - it was down a small hill and nothing is stuck on. With blue out the way I set about sorting everything and ensuring there is a place for everything and everything in its place, this took about 1 hour and in the mean time I lent Rich the golf gti to go and fetch some new ring spanners. Rich came back with 2 sets of ring spanners and a box of o-rings... Spanners by the way, aldi £3 and they are not bad quality either, its always good to have some low cost tools as you can bend them and file them as and where required. Ratchet spanners are a god send and are at aldi for £12.99 from the 28/01/2010 so if you have not got a set get there!
Back to blue; with blue out I set about removing the wheels and jacking the car up, I forgot the undo the wheel bolts slightly before I put the car on stands, this would not normally be a problem and Rich jumped in the car, put his foot on the break, I told him to break harder this ended with the front partly melted break line failing and spraying fluid forward away from the car.
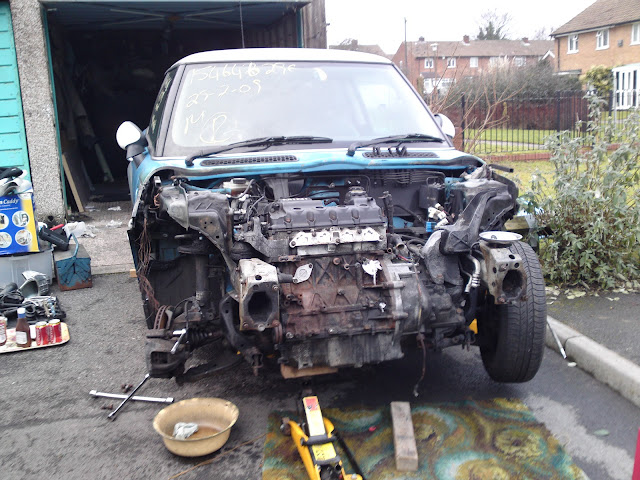
with the fluid dripping my attention moved to draining the break fluid at the front and removing the break line and calliper. The line was swiftly removed with the 10mm spanner. The two calliper bolts however needed use of my breaker bar (a 1m SS304 2" OD exhaust bar with a 2mm wall) ~ the bar works for every application and fits even the largest tools.

With the calliper off and the fluid no longer dripping I set about removing the sump plug, this has been on for a while and was stuck solid neither rich or myself could remove it till I broke out the breaker bar, it came off quickly and I drained the oil. This involved some swift drain pan changes and included me running around like a headless chicken trying to find where I had put the other tin. With the sump drained I spent an age trying to remove the spanner from the bolt as it had got stuck, I eventually removed it with the help of a friend "Chris".

With the oil out the next job was the gear box fluid, this was simple to do and while it drained I set about removing the exhaust manifold.
Manifolds are always hard to remove due to the constant expansion of the steel bolts and aluminium head. I could not believe my luck when the just came out with virtually no effort or stress.
Off to help Rich with the cam now, he had removed the rocker cover and followed my advice or making a template to ensure the bolts go back in the same place and the bearings etc all went back where they came from - if you do this job be careful as the wrong bolt or bearing in the wrong place could cause you trouble. I also have some tips here for changing the cam.
Firstly the Haynes states to use a home made tool for the job, I use an AF34 its simple and OK on a chain driven cam.
I would advise that you remove the spark plugs and all the rocker gear first. You should also back off the cam sensor though you can just get away with it in place, also you do not need to remove the engine mount as it states in the Haynes, a flexi head ratchet spanner will do.
With the rocker gear removed ensure that the arrow on the cam gear is pointing up in the direction of the engine, place your AF34 on the cam flats on the inner of the cam gear, hold tight and loosen the nut from the cam. Take a bright colour cable tie and put this round the chain and through a hole on the cam gear, this will help to keep the chain in place. lower the bonnet slightly about 2" and tie string or wire around the cam gear and the bonnet this must be tight and secure. Now using a 14mm ring spanner remove the tensioner bolt by the oil filter housing, this is hard to get too. once undone remove the tensioner you will be able to feel it in the hole where the bolt came from, as you are removing the tensioner push the bonnet up this will take the tension of the chain and lift the cam up. Now take the cam bolt out and cam out and replace it with your other cam, place the cam bolt back in and tight. squash the chain tensioner I find placing it on the floor on cardboard and use a ring spanner to compress it is fairly easy and safe. place the tensioner in and put the bolt back, make sure this is tight and you will notice that the bonnet is pulled back down. You may now remove the tie to the bonnet and you can remove the cable tie too use the AF34 spanner and torque the cam bolt to the required lever. Put the rockers back where they cam from and make sure that the rollers are in the correct place and the tappets are on the valves, follow the correct order and tighten the bolts to the correct torque level in the correct order. Once done put the rocker cover back on, you may wish to change the gasket if required.
With the cam back and several cuts later it came clear that the engine was not going to come out, I decided to get the wheels back on blue and push it back in to the garage, this took three people.
To sum up the day, yet again another person had their car done and blue didn't get much, I cleaned out the oils and fluids and got several cuts for the first time and not even on my car...
Next week I will not be helping anyone! the engine will be out next week and I may even strip the gearbox and replace the part.
FYI the rumours and emails I have been receiving about blue are not all true this car is not having a 1.8T 20V engine that's another project and not mine