Over the years of this what is now quite a long drawn out slow build as I have little to no tome to work on it I have been asked so many times what about the windows? I have always given the response that it is not an issue, time consuming and expensive yes but not a show stopper
Lets start with the sides, rear, and front sides.
Last post you may have seen that I had the plastic safety glass arrive, this was created from fibre glass templates I had sent them, they are all e46 marked direct from the manufacture which is a legal requirement to go on the road. My thanks here go to plastics4performance who helped by manufacturing to size and delivered as expected.
All I can say is this was so easy, you may ask why I did not cut the glass down? the long and short of it is you can't really cut toughened glass which all the sides and rears always are. If you tried to cut them they would explode in to tiny pieces and the only way about this would be to anneal the glass and then re-toughen it which at home is near impossible.
With the glass to hand this was bonded into the car and it all looks very OEM with the painted black edges and as I went with the 4mm hard coated plastic other than it sounding like plastic when you tap it the performance is the same glass regarding scratching.
With the side glass all in place (fronts are in the door) I will post a picture next time it it out with the windows up. I realised that I needed to cut the front laminated screen down to fit.
I had purchased a few screens which could have been 2 years ago and they had just sat in the garden collecting mud and muck. I took the time to clean them back to a fresh clean finish first.
With the windscreen clean it was time to mark it out, I had to lean over the glass to mark it and put my knee against it which saw the first screen smash... I was gutted, smashed before I started.
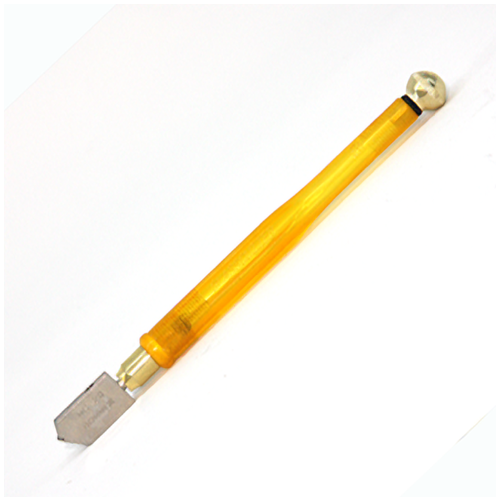
OK, so I had smashed the glass but thought this would now be a good piece to trial cutting on, so the tools used to do the job as this is something not very well covered on the net, a oil filled glass cutting tool filled with baby oil or 3in1 with a thin viscosity, sharp Stanley knife, blow torch, and some goggles & gloves. The time taken after marking was no longer the 10 minutes. Only important note is to make sure that the screen is fully supported, I used old rags and bags of shredded paper.
With the glass all marked up the first thing to do was relieve some of the stress on the glass, this was done by removing the two top corners down to the mark we would cut across later. Take the cutting tool and score in across the corner, do the same on the other side of the glass in about the same area, the closer the two lines the more success you will have, take the other end of the cutting tool and there should be a metal cap, tap on the score line from the underside this could be either way around, as you tap you will see the top piece of glass crack along about 30mm then tap the top score line and you will see the bottom score crack - keep doing this till you have worked along the score and it is broken. next you need to remove this section, I used a blow torch to pass up and down over the crack 3 or 4 times without pausing on any area. Too much heat and you will burn the laminate and you will cause bubbles in the glass you want. with the laminate hot have someone hold the glass while you pull the corner (this may be hot) also do not try and bend the laminate and glass else you may chip and crack the glass you wish to keep, once the glass has pulled take your knife and cut the laminate, you are done with the corner so do the other.

With the corners removed the glass was scored along the screen and the same process was followed, the glass seamed to tap and crack better with the middle at its lowest point. I had to pass the blow torch over about 8 times due to the 15 degree C ambient temperature and a slight breeze. Then the glass was separated by pulling the glass from one end, once the knife was in the laminate was pulled and cut.
OK, I was happy with the smashed unit so this process was followed again, this time without putting my knee through it and I am glad to say everything went well and the screen is now placed in the car.
I need to now paint the top of the glass as I have no black edge and can see body work under but once that is done it will be bonded in and the car will be mostly water tight, I say mostly as I have to finish the door and boot seals...
For those that are interested here is a list of tools again
- Blow torch
- Glass cutting tool with oil, the same used to cut flat glass and used in stained glass workshops
- Gloves & glasses
- Sharp bladed knife
Tool used