Thursday, 24 January 2019

Now it's a turbo R53

Lot of time spent in the garage working on the turbo conversion and it's in and running - even tuned.

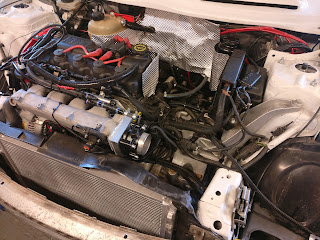
After having installed the new manifold, turbo, exhaust and all the cooling I then had to obtain a new bumper bar for the front and cut out an area for the front mount charge cooler and oil cooler.

The pipework was tight and fitting was tight but quite easy. All made in one piece from the turbo to the charge cooler and then back to the manifold - Also on the last update I had modified a stock manifold to take a throttle for the turbo but now it is changed to the custom inlet manifold which has given me some more room. The pipes and manifold were all the powder coated to match the wheels and roof. The bumper bar received a nice matt black finish and the coolant header tank which had been cut up got re-coated in red


Turbo all installed prior to going off for the rolling road. Starts and runs well although the first start had a big puddle of oil on the floor because I had not put the oil return into the sump... Didn't take long to spot that!


Next I set about creating a set of GP style skirts using foam and 2 sets of cooper skirts. they have come out really nice and I decided to follow the arch round and I think it looks correct, these can be sourced directly from me on the shop link at the top of the page or through Orranje performance


Not the best photo but there isn't much to do, skirts fitted and I am really pleased with them and the front bumper - still have plans and ideas but they can all wait until the car is on the road 


Dyno was done at 1320 and it made great power at 22psi the car made 322whp (370bhp+/-) however there is still a lot less as the boost can be pushed up to 27psi but drive ability is more important for me at the moment and power can come later.
I have realised that I can't drive the car without stalling it either! this is the light weight flywheel, the rpm drops so quickly and I am just not used to it. I do recall hating my last R53 for this very reason

Friday, 4 May 2018

A change of performance

I took the car off for another tune in the hope that I would be able to close the book on the engine for a while as I have had enough

Here is a photo of the build with the new charge cooler on top and at the front


On the way to the dyno
The supercharged engine made 275whp and was defiantly more derivable, however a few days later I needed to move the car and with a cold engine there was still an idle issue which made me confirm that I have had enough of throwing money at the blower conversion and I was going to go down a simple route of adding a turbo


Car strapped down to the dyno and the main issue being that the IAT would rise to 120 degrees C in less than 10 seconds of hard boost but would drop down as quickly when lifted off so this was the main issue


 With the car back I set about removing the blower and all the parts that went with it. As I have decided to put a turbo on and run with it.
I decided that I would use one of my R50s I have laying about for parts so went and grabbed the coolant pump, alternator, hoses and front panel.
The blower was removed, battery taken off and relocated the battery back to the boot as I had relocated it to the engine bay. Further more I also took the crash panel from the cooper as I had cut the last one up to accept the radiator and I wanted this one to take the intercooler cut out


New radiator in place, crash beam and radiator support and fan. I am aware that the cooper front panel is different to the S I plan to trim it down a little in the future


I have been advised that the 2.5" exhaust should be changer out to a 3" so I set about building a new exhaust with a 200 cell cat


I machined a plate up to accept the throttle on the inlet manifold and welded it on to the original manifold


New front mount roughly in place with the new oil cooler. From there the power steering tank and coolant tank were relocated to allow Ronr for the manifold and down pipe


With all the old supercharger equipment removed the car was then ready for the turbo system.
I've decided to go with a side winder style turbo setup commonly used on Honda's and having seen it on a few minis I thought I like what's been done and it's so simple.


Still got a lot of work to do but shouldn't take too long and then once the manifolds done I've still got to do the oil lines and return


Tuesday, 1 August 2017

RKDE53 kit bumper install

The bumper is the first part of the kit, it will be followed by a GP style skirt already in the making and then a rear R56 style bumper. All of which I am quite excited about and then on to other kits potentially...

Each bumper I make is tested on a vehicle and is also measured to several key points to make sure this will fit, I hate the bad name people have given to GRP because of poor molding techniques and bad storage or items which have been made in a rush.
Every part I make has time and experience into each item, however with every hand made item you need to check and double check but no modifications are needed with the exception of adding fixing holes, 2 at the bottom to go into the front wheel arches and 2 at the top of the wheel arches, the holes for the main fixings are already in place.

As part of the test fit I tried the grills in place to be sure they sit OK which they do and there is no need to trim any structure of the car to make the bumper fit. On mine it is different but on all normal cars the bumper fits with no issues.


Happy that the bumper aligns with everything I gave the bumper a quick key with a scotch pad and set about spraying with an etch primer. This was followed by a high build primer, guide coat and then a base and clear. The prep work was simple and easy. Just the way I intended


 Once painted I put it on the car so I could admire the work gone in, I had to get the grills in...


There are several ways to attach the grills, one method is to sand the lip on the bumper on the inside until it is thin enough to allow for the grills to push on or the other method which is what I chose, remove the upstand lip all the way around the grill and the light housing so just a flat is left.
Cover the flat edge with a good PU adhesive like tiger seal etc and then push them into the bumper and hold into place for several hours - I turned the bumper over and used a can of paint as the ballast but I could have used tape to pin it but the paint was only hours old.


Bumper installed but I can't close the bonnet because I know the cable has snapped and getting in last time was a horrid experience I do not want to go through again...


A lot of people have asked what I am going to do with the lights? well there are several solutions;
  • Use the DRL kit in the headlights for side lights and have the indicator in the in the lower globe using the 501 bulb as the indicator and the H8 as the fog
  • I could use the DRL as the indicator and then keep the fog and side light at the bottom
  • The option I am going for at the moment is to use an amber LED H8 bulb for the indicator where the fog light was, and I will keep the 501 bulb as another side light as well as the DRL lights but over time this may change??
To make the 501 lights work you will need to add some cables which can be purchased from mini, I got mine from Cotswald mini for just under £10 delivered 

  • 61 13 0 006 624 (X 4) 
  • 61 13 8 373 332 (X 2)

You will also need to convert the lights for the fog or whatever you will use it for, for this just use a typical H8 connector which can be purchased from ebay or similar


Monday, 31 July 2017

RGB LED headlight cluster installed

I've gone an installed my LED conversion into the car and I am really pleased with the results;
My plan is to run the lights as white DRL but as I designed the kit I decided to allow for the functionality of any colour, why not...

Videos of the lights on with the LEDs running


The kit I have is running the bluetooth controller and because I have an android headunit I can control the lights from the headunit.
The lights once setup will remember their setting so each time the car is started it will return to the last setting.

The lights are connected to the side lights so I have some control over the lights but I may change this to an ignition point as I also have LED side lights in the bumper

Some photos of the colours


Where can you get the kit? head over to my shop or get in touch with me